Tuesday, May 29, 2012

Lunge Better

Good hip flexor stretch

One of the most popular leg exercises in the gym is the lunge. It's straightforward enough that anyone and everyone can usually do it. Place one foot out, lower yourself, then return to a stand.

The problem that tends to plague it is that it gets butchered when a person isn't aware of how to execute it. Not only that but the most common variant is the forward lunge with dumbbells.

Also as of recent I've noticed more use of Bulgarian split squats as the go to single-leg exercise. Each exercise has their place and Bulgarian split squats are great. What I specifically like about lunges is the moving component, especially in the walking version.

Lunges aren't too hard and are a great single-leg exercise as well. After adjusting to the change in balance and a few tweaks here and there, a person can move better within minutes.

Try these cues and see how they affect your performance.
Visualize a Hurdle
- Sometimes stride lengths are unintentionally cut short. For each rep lift your knee straight up and then shoot your foot downwards at angle in front of you. Imagine you're going over a small box.

Lift your knee straight up,
then aim your foot down at an angle.

Land Close to Parallel
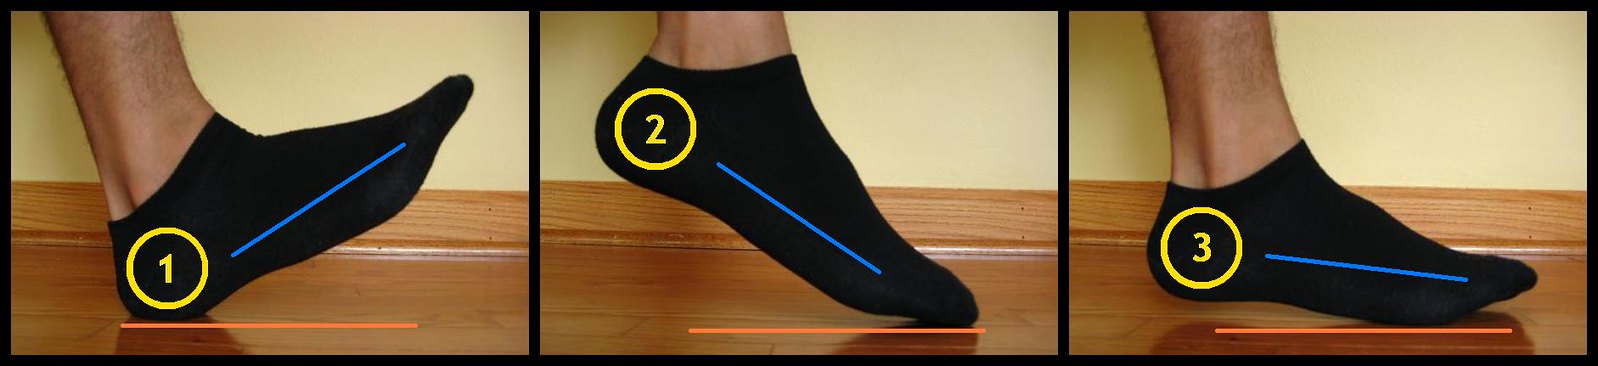
- This is a very subtle detail. The foot should be close to parallel when making contact with the ground. It has a slight down tilt, plantarflexion, to it. Look at this diagram,

Click to enlarge
(Trust me, you should)

The blue line is the angle of the foot and the orange line is the ground. Starting from the left, let's discuss each image.
  1. A heel strike is the most common action you'll see. This isn't necessarily bad but I haven't seen it contribute to a better lunge.
  2. Here is an exaggeration of the down tilt. You end up landing on the very front end.
  3. In the far right illustration the foot is almost parallel to the floor. It's similar to an airplane landing on a runway. The nose of the plane is pointed down enough that it's able to make a light impact on the ground.

    Here the foot is angled down a little bit. It can better absorb the shock of impact and get a firm holding underneath it.
Plant the Foot SOFTLY
- Lower the foot while attempting to make almost no noise. Plant it as gently and softly as possible. Let your body sink down on your heel. It will ensure your torso remains upright while you keep your balance.
Reverse Directions
- After you've lunged down, push through your heel to come straight UP. Then you can bring your foot back. Only return to a start after you've stood up. It becomes much more difficult to do if you're still in a knee flexed position.
Now what if you're having trouble despite using these cues? Practice with your bodyweight and hold each position for a few seconds. Work on stepping out and getting accustomed to the split stance. From there lower yourself a few inches, pause, stand, and repeat. Go lower each week then start with low reps. When you get the hang of it, add dumbbells.

As for programming them into a workout there aren't any rules to follow. I find they place nicely after a heavy compound movement like squats. A light set or two of 5-8 reps is enough to elicit a positive training effect. Ultimately the training parameters - and variation - are up to you.

One thing is certain: Don't neglect your legs by avoiding lunges. They're a very important exercise.
Further reading,

Thursday, May 17, 2012

Picking Your Shoes & Socks

What's your pick?

In strength training a person doesn't need much gear to lift. Shoes, socks, and that's about it. Even those aren't entirely necessary in a home gym. When competing, assistive equipment becomes an additional option. This includes belts, straps, suits, heeled shoes, and chalk.

But shoes and socks are usually glossed over by a trainee. There are a few nuances you should know about to maximize the comfort of your feet.
Socks
  • I like my socks like my shoes - very thin. Thick socks muffle your foot's ability to feel around in the shoe. It's similar to wearing overly supportive shoes where you're unable to feel the ground.
  • Make sure your socks breathe well. Feet get hot in shoes as is but the wrong socks can make your feet exceptionally sweaty.
  • Thin socks are great but not if they are constantly shifting around. They should conform well to your feet.
  • Long socks are often recommended for deadlifts and floor pulls. They protect the shins from the bar scraping them. This is actually a technical error. It can be the result of employing the back too early or just trying too hard to keep the bar close.

    Whatever the reason may be it creates friction and slows down the pull. Long socks reduce the problem but they don't eliminate it. Practice with short cut socks to ensure you're not scraping your shins.
  • Currently I use low cut Hanes socks. The elastic might be too low for some people as they can go into the shoe and slip off the back of the foot. If that's the case choose ankle socks such as these. (I'm not recommending Hanes. They're examples.)
Shoes
  • I say no shoe is the best shoe. However due to hygiene and safety issues that never sits well with gym staffs.
  • Since going barefoot isn't always a choice choose a thin minimal support shoe. It should be able to bend in half, twist, and be very flexible.
  • A good shoe will allow you to feel varying terrains. This is most noticeable when stepping on small rocks.
  • Secondary characteristics to consider are price and style. Some shoes are fashionable enough that they can double for casual wear.

My shoe choices
Left: Tai Chi's by Asics / Right: Martial Arts Slippers

  • BirthdayShoes.com is an excellent site for all things regarding minimal shoes. Use it to browse different shoes and their reviews.
Squats
  • Squat are another issue when determining your shoe.
  • Because ankle mobility, specifically dorsiflexion, is limited by genetics squat depth will stop at a certain point. Go pass that point and the chances are your form will be compromised.

    Toes go up [dorsiflexion],
    toes go down [plantarflexion]
    .
  • The elevated heel on weightlifting shoes reduces this problem and allows for deeper squats with a more upright torso.
  • How necessary is the heel? It depends on the lifter and is wholly up to them. Squats become easier but they can be done completely fine barefoot.

    I'd say front squats are the exception to this. In front squats you want your torso to stay as vertical as possible. Weightlifting shoes do a great job at accomplishing this.
  • If you feel you would benefit from a weightlifting shoe, check out WLShoes.com. The site reviews many of the weightlifting shoes currently on the market.
Picking the right socks and shoes for yourself isn't too hard a topic. Use the above information to narrow down what fits your preferences and see how it feels.

If you like your choice and it feels good when you lift that's all that matters.

Wednesday, April 25, 2012

Third Pull

Some serious pulling

I first learned about the third pull reading Tommy Kono's books. To paraphrase his explanation, in the snatch it occurs right after hip extension when the bar is traveling overhead. During this transition the lifter actively pulls themselves under the bar by raising their elbows up and keeping their wrists down. In the clean it happens following hip extension where the lifter shrugs to pull their body under the bar.

You can get a feel for each by using a light stick (like PVC pipe) and slowly going through the motions. Progressing to the barbell gives you a little more variety to choose from - specifically high pulls and technical pulls.


Snatch High Pull

For the high pull, execute the snatch as you typically do but after the hips snap, immediately pull your elbows up while having your wrists down and in towards yourself. You want to stand as tall as you can and get the bar to around the nipple/armpit area. If you end up on your toes so be it, but it shouldn't be an intentional action.

Technical Pull

While searching online one day I came across these from crackyflipside over at the BodyBuilding forums. These are very similar to high pulls but here the pulls are to the neck with a fast quarter squat to have the body meet the bar. This is the closest pull you can get to a snatch without actually going under the bar and getting it overhead. The execution is like the high pull but after the hips snap there's a QUICK change of direction from the tall standing position to a quarter squat.

The clean versions can be done for either exercise using a narrower grip. However since the bar isn't pulled that high in heavy cleans you can cut the movements short. Let the hips extend and when the bar is right below the navel shrug as you stand tall [high pull] or simultaneously do a shrug and quarter squat [technical pull].

I'd say technical pulls are a progression to high pulls because of the added component of changing directions. Also when incorporating these keep in mind the higher the bar goes the less weight is used for the exercise. These exercises aren't for moving a lot of weight but instead for technique work.

Lastly they can be done from any position. I recommend performing them from the floor to develop a smoother pull. If you get tired starting from the floor then switch to a hang. And if you have straps use them for the snatch pulls. A comfortable grip lets you focus better on the movement.

A good third pull will help you move more efficiently under the bar.

*UPDATE: You can view video demonstrations of the technical pull here.

Related articles,

Tuesday, April 10, 2012

Cardio

Dean Karnazes ran 50 marathons in 50 consecutive days.

Whether it's here on the blog or elsewhere, I rarely discuss aerobic exercise - commonly known as cardio/energy systems work. I primarily avoid it because (1) it's overzealously used, and, (2) in my opinion, the poor handling of strength training warrants more attention.

What constitutes aerobic exercise? Usually most people think of running, cycling, and swimming. However it also includes jump rope, rowing, circuit training, the elliptical trainer, and many more activities. The focus of this post will be predominantly on running.

Running is easy. There's no cost association, virtually zero instruction, and it can be done almost anywhere by anyone. Like I said it's easy. But that's the problem in and of itself. Typical running is too easy. If you're doing exercise that's not difficult then there's no reason to call upon your energy reserves (excess body fat).

Notice I specifically wrote "typical" running. I consider this to be running where the individual moves at a slow pace and does a sort of scuttle where the feet only lift a few inches off the ground. The person is relying on high volume of a low effort movement. It's an ineffective way to exercise for performance gains.

*I'm not covering stride form in this post. Just search Youtube for sprinters and watch how their legs move.*

In weightlifting I like low volume and high intensity exercise. I feel the same applies to running and other forms of aerobic exercise. Sprints and uphill running are excellent forms of intense running. Although not every runner chooses to run short distances that are 100 meters or below. Some runners compete in sports that entail a lot of miles making high intensity runs not a suitable choice.

With that said, you can make your aerobic exercise more effective by using the following guidelines when you train:
  • Select a distance you want to complete and time yourself. In every subsequent run of equal distance aim to improve your time from the previous run.
  • Alternatively when you run cover as much distance as you possibly can in a given time. Similar to the option above, you want to improve by covering more distance than in your previous run within the same amount of time.
  • Add variety by breaking a long run into multiple smaller runs and resting between each run.
    - If your goal is to run 3 miles then divide it into six 1/2 mile runs the first week, three 1 mile runs the next week, two 1.5 miles runs the following week, and a 2 mile run plus a 1 mile run in another week.
    There's a ton of freedom in how you choose to divide and arrange your runs
These rules also work in sports that aren't distance-based such as kick boxing or jump rope. In place of distance you would account for the amount of strikes or how many times you skip rope.

And that my friends is my brief discussion on aerobic exercise - something I do very little of.

Related articles,

Wednesday, April 4, 2012

Time-Based Workouts

Use the clock!
(Or a stopwatch)

In exercise time is an overlooked variable. It only becomes relevant when you ask yourself, "Do I have enough time to work out today?" I think time is an easy way to plan training. (An example I've noted in the progressions post.)

Another simple way to do a training session is by allotting a specific amount of time to each movement. I picked this up from coach Kirksman,
"...and athletes usually use how they feel and time blocks. For example, 1 ¼ hours is spent snatching, 40 minutes snatch pulling, 30 minutes block snatching and 30 minutes of practice. During this period, they try to take as many sets, reps and weight as possible."
He's speaking in reference to Olympic weightlifters. A recreational exerciser wouldn't be lifting anywhere close to 3 hours. (I hope not!)

Designing training is straightforward. First divide up time amongst each lift. Then use how you feel to figure out the number of reps to complete. Do this by performing your first set. Gauge what you feel is a comfortable number for each set. It doesn't have to be the same rep amount for each set but it gives you an idea of what range you'll be in for that day - think + 1-2 reps. Don't worry about sets because you stop when the time is over for that exercise. Rest periods can be timed but don't have to be. Wait until you're confident you can complete another quality set without failure.

In practice an example bench press day would look like this,
1) Warm-Up
  • Mobility: Thoracic spine extension and rotation
  • Multi-joint Drills: Band pull-aparts, push-ups

2) 25m Bench Press, 3-4 reps

3a) DB Row
3b) DB Floor Press
  • 15m total, 6-8 reps

4) 10m Face Pulls, 8-10 reps

5) Cool Down

  • Stretch pecs and lats
  • Overhead DB walk: 1m each hand
The benefit I see from creating time blocks is prioritization in the workout and that there's room for adjustments from one's own individual feedback. The workout is tailored to you instead of you being tailored to the workout. (Think about it.)

By manipulating time you'll be more aware of how your body responds to training. You'll also find you can get in and out of the gym quicker too!

Thursday, March 29, 2012

Feet in Split Jerk

Every now and then on Youtube I'll watch weightlifters - some amateur, some elite. I notice most of the people who split jerk appear to execute it too early. Despite it being a very fast movement it's important to move under the bar at the right moment.

The lifters who split jerk prematurely tend to do so at the apex of the dip back up, specifically at this point:
Take note of how his feet are almost off the ground. Many lifters choose to jerk the bar during this ascent. As a result the front foot leaves higher off the ground. Their foot does a sort of hop forward.

I've learned from other sports that footwork has a standard rule - when the feet move they should move while staying as close as possible to the ground. My short experience with kendo, eskrima, grappling, and ballroom dancing hold this fact true. There are no hops or tall strides.

Allowing the foot to rise higher than needed creates more distance it has to travel. Not only that but imagine where your foot would be more stable. When you have a heavy bar overhead, do you want your foot near the floor or far from it?

The weightlifting coach at my school gave a great tip. He said "slide" your feet out instead of jumping them out. It's a good way to visualize how to split as you drop under the bar - not while you're still driving the bar upwards.

It takes patience to not split early but if you wait you'll have a more solid jerk in the end.

Related articles,

Friday, March 16, 2012

Long Arms

Pulling with bent arms.

The only lift that benefits from long arms is the deadlift. They help grab the bar at a high hips position and the bar travels a shorter distance for lock out. On the other hand this is absolutely terrible for cleans.

In a clean the bar needs to reach a specific height - slightly below the navel - to allow the lifter to speed under it. After all pulling the bar higher takes more effort and strength. In competition it's better to pull a heavier weight at a low height than pulling a lighter weight high.

The problem comes when long arms put the bar too low. This causes the pull after extension to be longer and makes it difficult to get under the bar. In the recent post "Moment of Power" I mentioned the bar should be in or near the crease of the hip. Chances are if you clean with long arms the bar will be closer to your knees than your hips.

The easiest way to get the bar further up the thigh is by widening your grip on the bar. Spreading the hands apart automatically moves the bar up a bit. If the bar isn't high enough the next cue to use is to "sweep" the bar in after extension. Think of it almost like putting on pants really fast.

Technique aside, those two methods should take care of most lifters. If your arms reach down to your knees you'll still have trouble. Don McCauley suggested on the Pendlay forums having the shoulders shrugged before starting the lift. There's also pulling with bent arms, but I believe there's a certain finesse to doing this correct.

And of course you can always try this,


Looks easy doesn't it?

Your leverages might not favor Olympic weightlifting but don't let that discourage you.

Always experiment, persist, and strive to improve.
Creative Commons License
Niel Patel's Blog by Niel K. Patel is licensed under a
Creative Commons Attribution-NonCommercial-ShareAlike 3.0 Unported License.